

Java Frameworks Integration
Welcome!
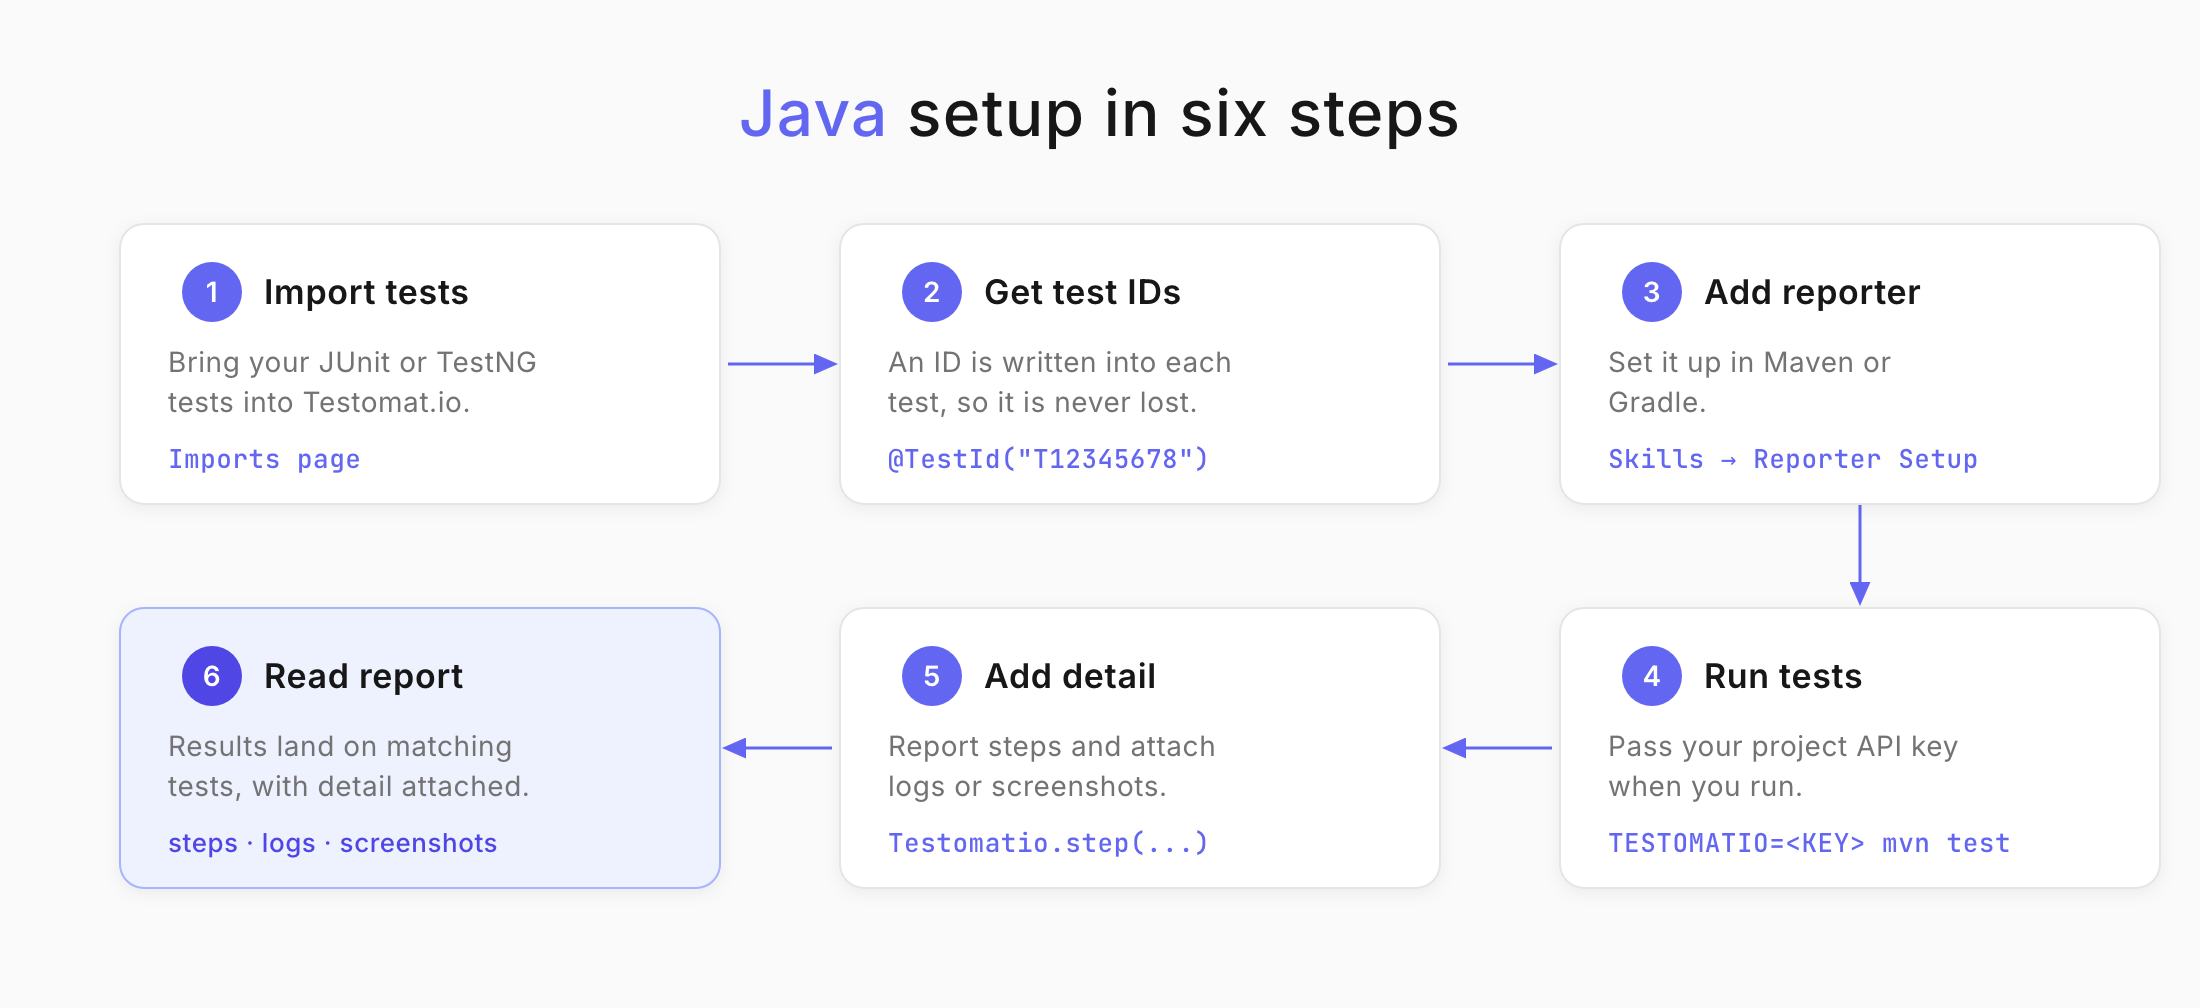
This tutorial walks you through connecting a Java test automation project to Testomat.io. You already have tests that run with JUnit 5 or TestNG - now you will bring them into one place where you can plan them, report on them, and dig into failures.
You will have:
- Your Java tests imported into Testomat.io.
- Test IDs synced between your code and your project.
- Run reports with steps, logs, and screenshots attached.
- Parallel jobs reporting into a single run.
Before you start
Section titled “Before you start”Make sure you have:
- A JDK installed, with Maven or Gradle set up for your project.
- A Java project with at least one JUnit 5 or TestNG test.
- A Testomat.io project you can sign in to, and its API key.
No Java project handy? Import the Testomat.io Java example project and follow along with that.
Import your tests
Section titled “Import your tests”Importing brings your existing tests into Testomat.io so you can plan, run, and report on them. Everything starts on the Imports page.
On the Imports page:
- Select TestNG or JUnit in the Project Framework field.
- Select Java in the Project Language field.
- Select your operating system under Import tests - Mac, Linux, or Windows.
- Copy the command that Testomat.io generates for you.
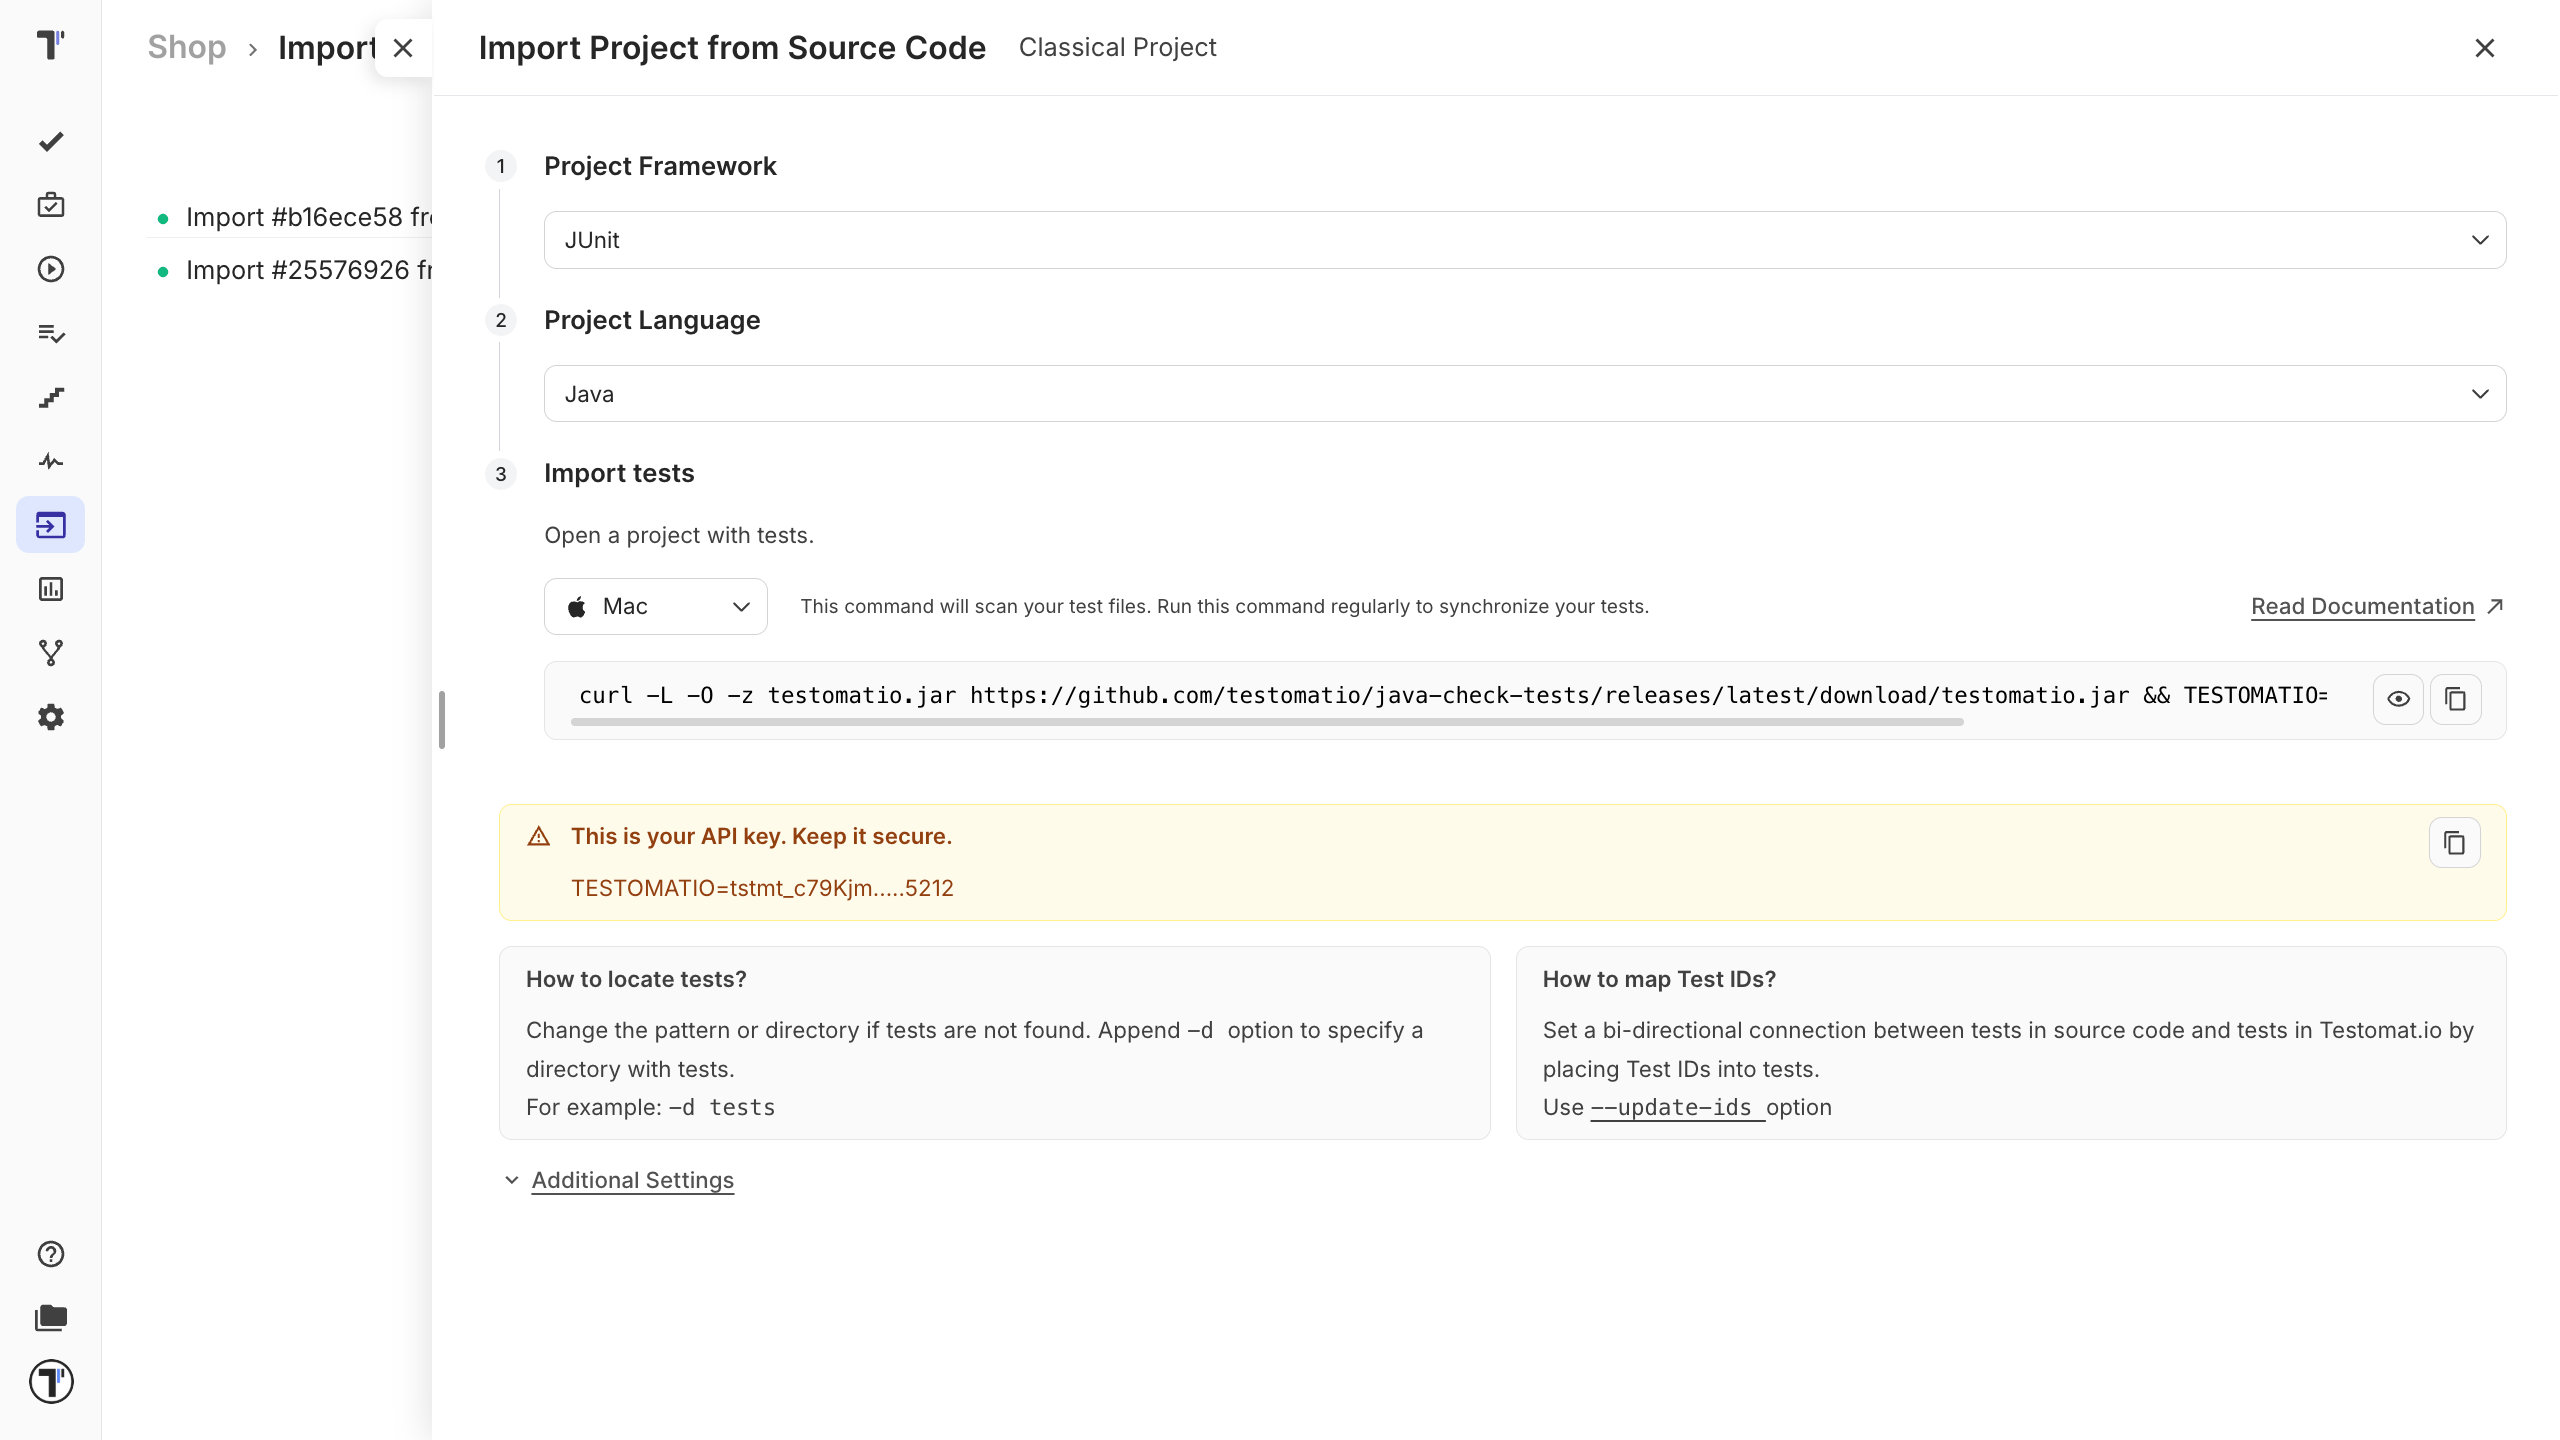
Now open a terminal, navigate to your project, and run the command you copied.
When the import finishes, you will see a report of how many tests were found. That message means it worked - your tests are now on the Tests page.
Choose your import options
Section titled “Choose your import options”You can change how tests are imported:
| Option | Description |
|---|---|
| Auto-assign Ids | Assigns a unique ID to each test. |
| Purge Old Ids | Removes previously set IDs from tests. |
| Disable Detached Tests | Disables tests marked as detached. |
| Prefer Source Code Structure | Keeps your source code structure in the test hierarchy. |
What gets imported from JUnit 5
Section titled “What gets imported from JUnit 5”Both plain and parameterized JUnit tests come across:
@ParameterizedTest(name = "Create user {0}")@ValueSource(strings = {"John", "Kate", "Mike"})void createUser(String userName) {    assertNotNull(userName);}
@Testvoid userShouldBeFine() {    assertEquals("fine", user.getStatus());}
What gets imported from TestNG
Section titled “What gets imported from TestNG”TestNG tests are imported and managed the same way:
@Test(dataProvider = "users")public void createUser(String userName) {    Assert.assertNotNull(userName);}
@DataProviderpublic Object[][] users() {    return new Object[][]{        {"John"},        {"Kate"},        {"Mike"}    };}
@Testpublic void userShouldBeFine() {    Assert.assertEquals(user.getStatus(), "fine");}
Testomat.io displays parameterized executions together with their parameter values.
Sync test IDs
Section titled “Sync test IDs”A test ID links a test in your code to its test case in Testomat.io. With IDs in place, Testomat.io tracks changes to a test instead of creating a duplicate every time your project grows.
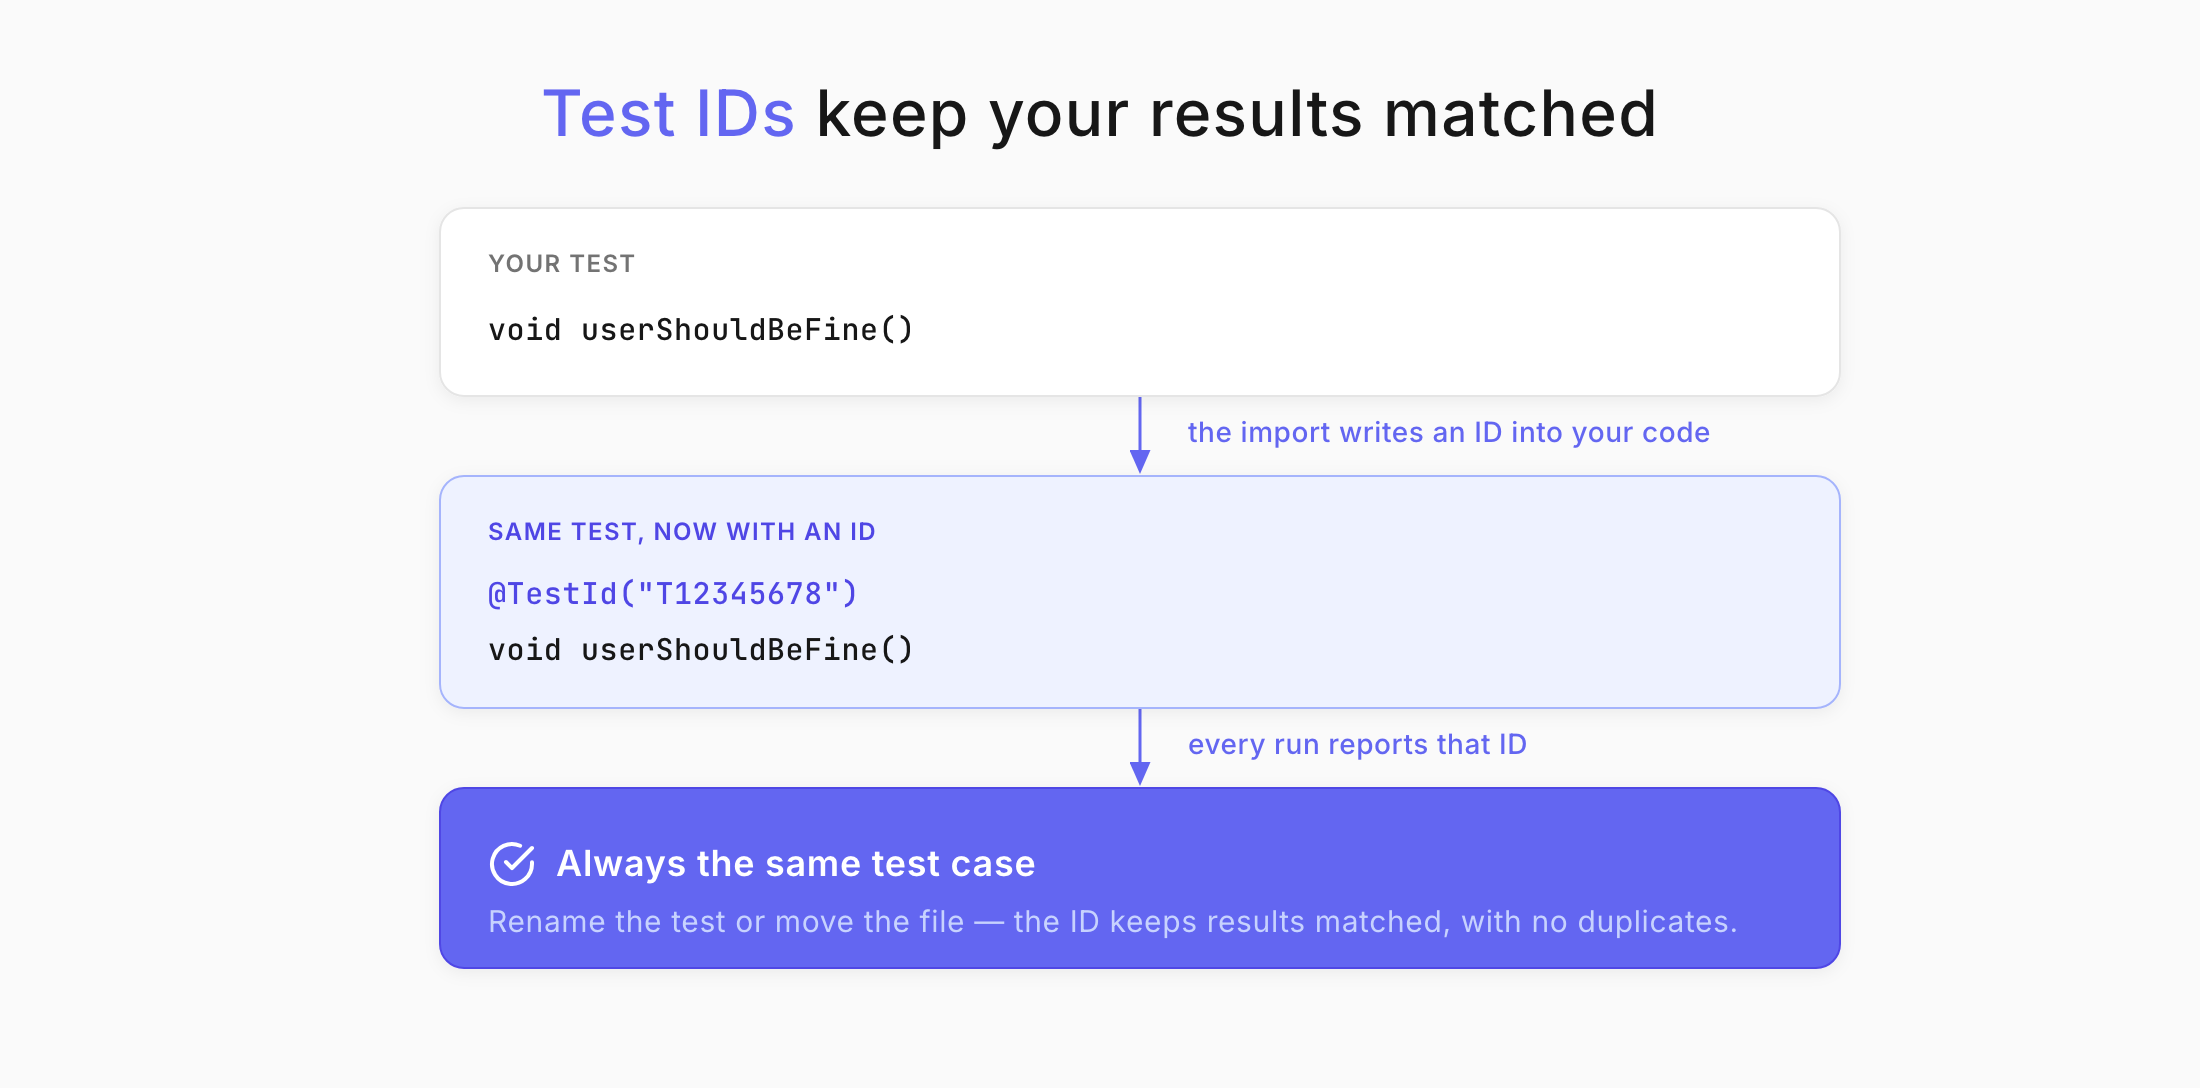
Enable Auto assign Ids (--update-ids) during import, and Testomat.io writes an ID into each test for you.
Your test before the import:
@Testvoid userShouldBeFine() { assertEquals("fine", user.getStatus());}And after:
@Test@TestId("T12345678")void userShouldBeFine() { assertEquals("fine", user.getStatus());}Your tests now carry the same IDs in your code and in your project.
Test IDs let Testomat.io identify a test even when its name, package, or source file changes.
Set up the reporter
Section titled “Set up the reporter”Before results can reach Testomat.io, your project needs the reporter. The quickest way is the Reporter Setup Skill, which detects your testing framework and build tool, installs the dependencies, and generates the configuration for you.
- Go Testomat.io skills repository.
- Follow the instructions to install the reporter.
- Use the generated instructions for your project.
The skill supports JUnit and TestNG with both Maven and Gradle.
The Reporter Setup Skill is the recommended way to configure reporting for a new project.
Report your results
Section titled “Report your results”Reports tell you what passed, what failed, and why. Pass your project API key in the TESTOMATIO environment variable when you run your tests.
With Gradle:
TESTOMATIO=<API_KEY> ./gradlew testWith Maven:
TESTOMATIO=<API_KEY> mvn testYour results now appear in Testomat.io, associated with their matching test cases.
Run only some of your tests
Section titled “Run only some of your tests”You don’t have to run the whole suite. With Gradle:
./gradlew test --tests UserTests./gradlew test --tests UserTests.userShouldBeFineWith Maven:
mvn -Dtest=UserTests testmvn -Dtest=UserTests#userShouldBeFine testReport test steps
Section titled “Report test steps”Steps show what happened inside a test, so you can see exactly where it failed.
Wrap a step inline:
@Testvoid userShouldBeFine() { Testomatio.step("Check user status", () -> assertEquals("fine", user.getStatus()));}Or annotate a method:
import io.testomat.core.annotation.Step;
@Step("Check user status")private void checkUserStatus() {    assertEquals("fine", user.getStatus());}
@Testvoid userShouldBeFine() {    checkUserStatus();}
If you already use Allure
Section titled “If you already use Allure”Testomat.io imports and displays your existing Allure steps - you don’t need to rewrite them.
@Testvoid userShouldBeFine() { Allure.step("Check user status", () -> { assertEquals("fine", user.getStatus()); });}Annotated steps work too:
import io.qameta.allure.Step;
@Step("Check user status")private void checkUserStatus() {    assertEquals("fine", user.getStatus());}
With Allure integration enabled, step information is synchronized with Testomat.io and shown in the execution report.
Attach artifacts
Section titled “Attach artifacts”Logs, screenshots, videos, and reports make a failure much faster to diagnose. The Testomat.io reporter uploads these artifacts to your own S3 bucket and links them to the matching test results.
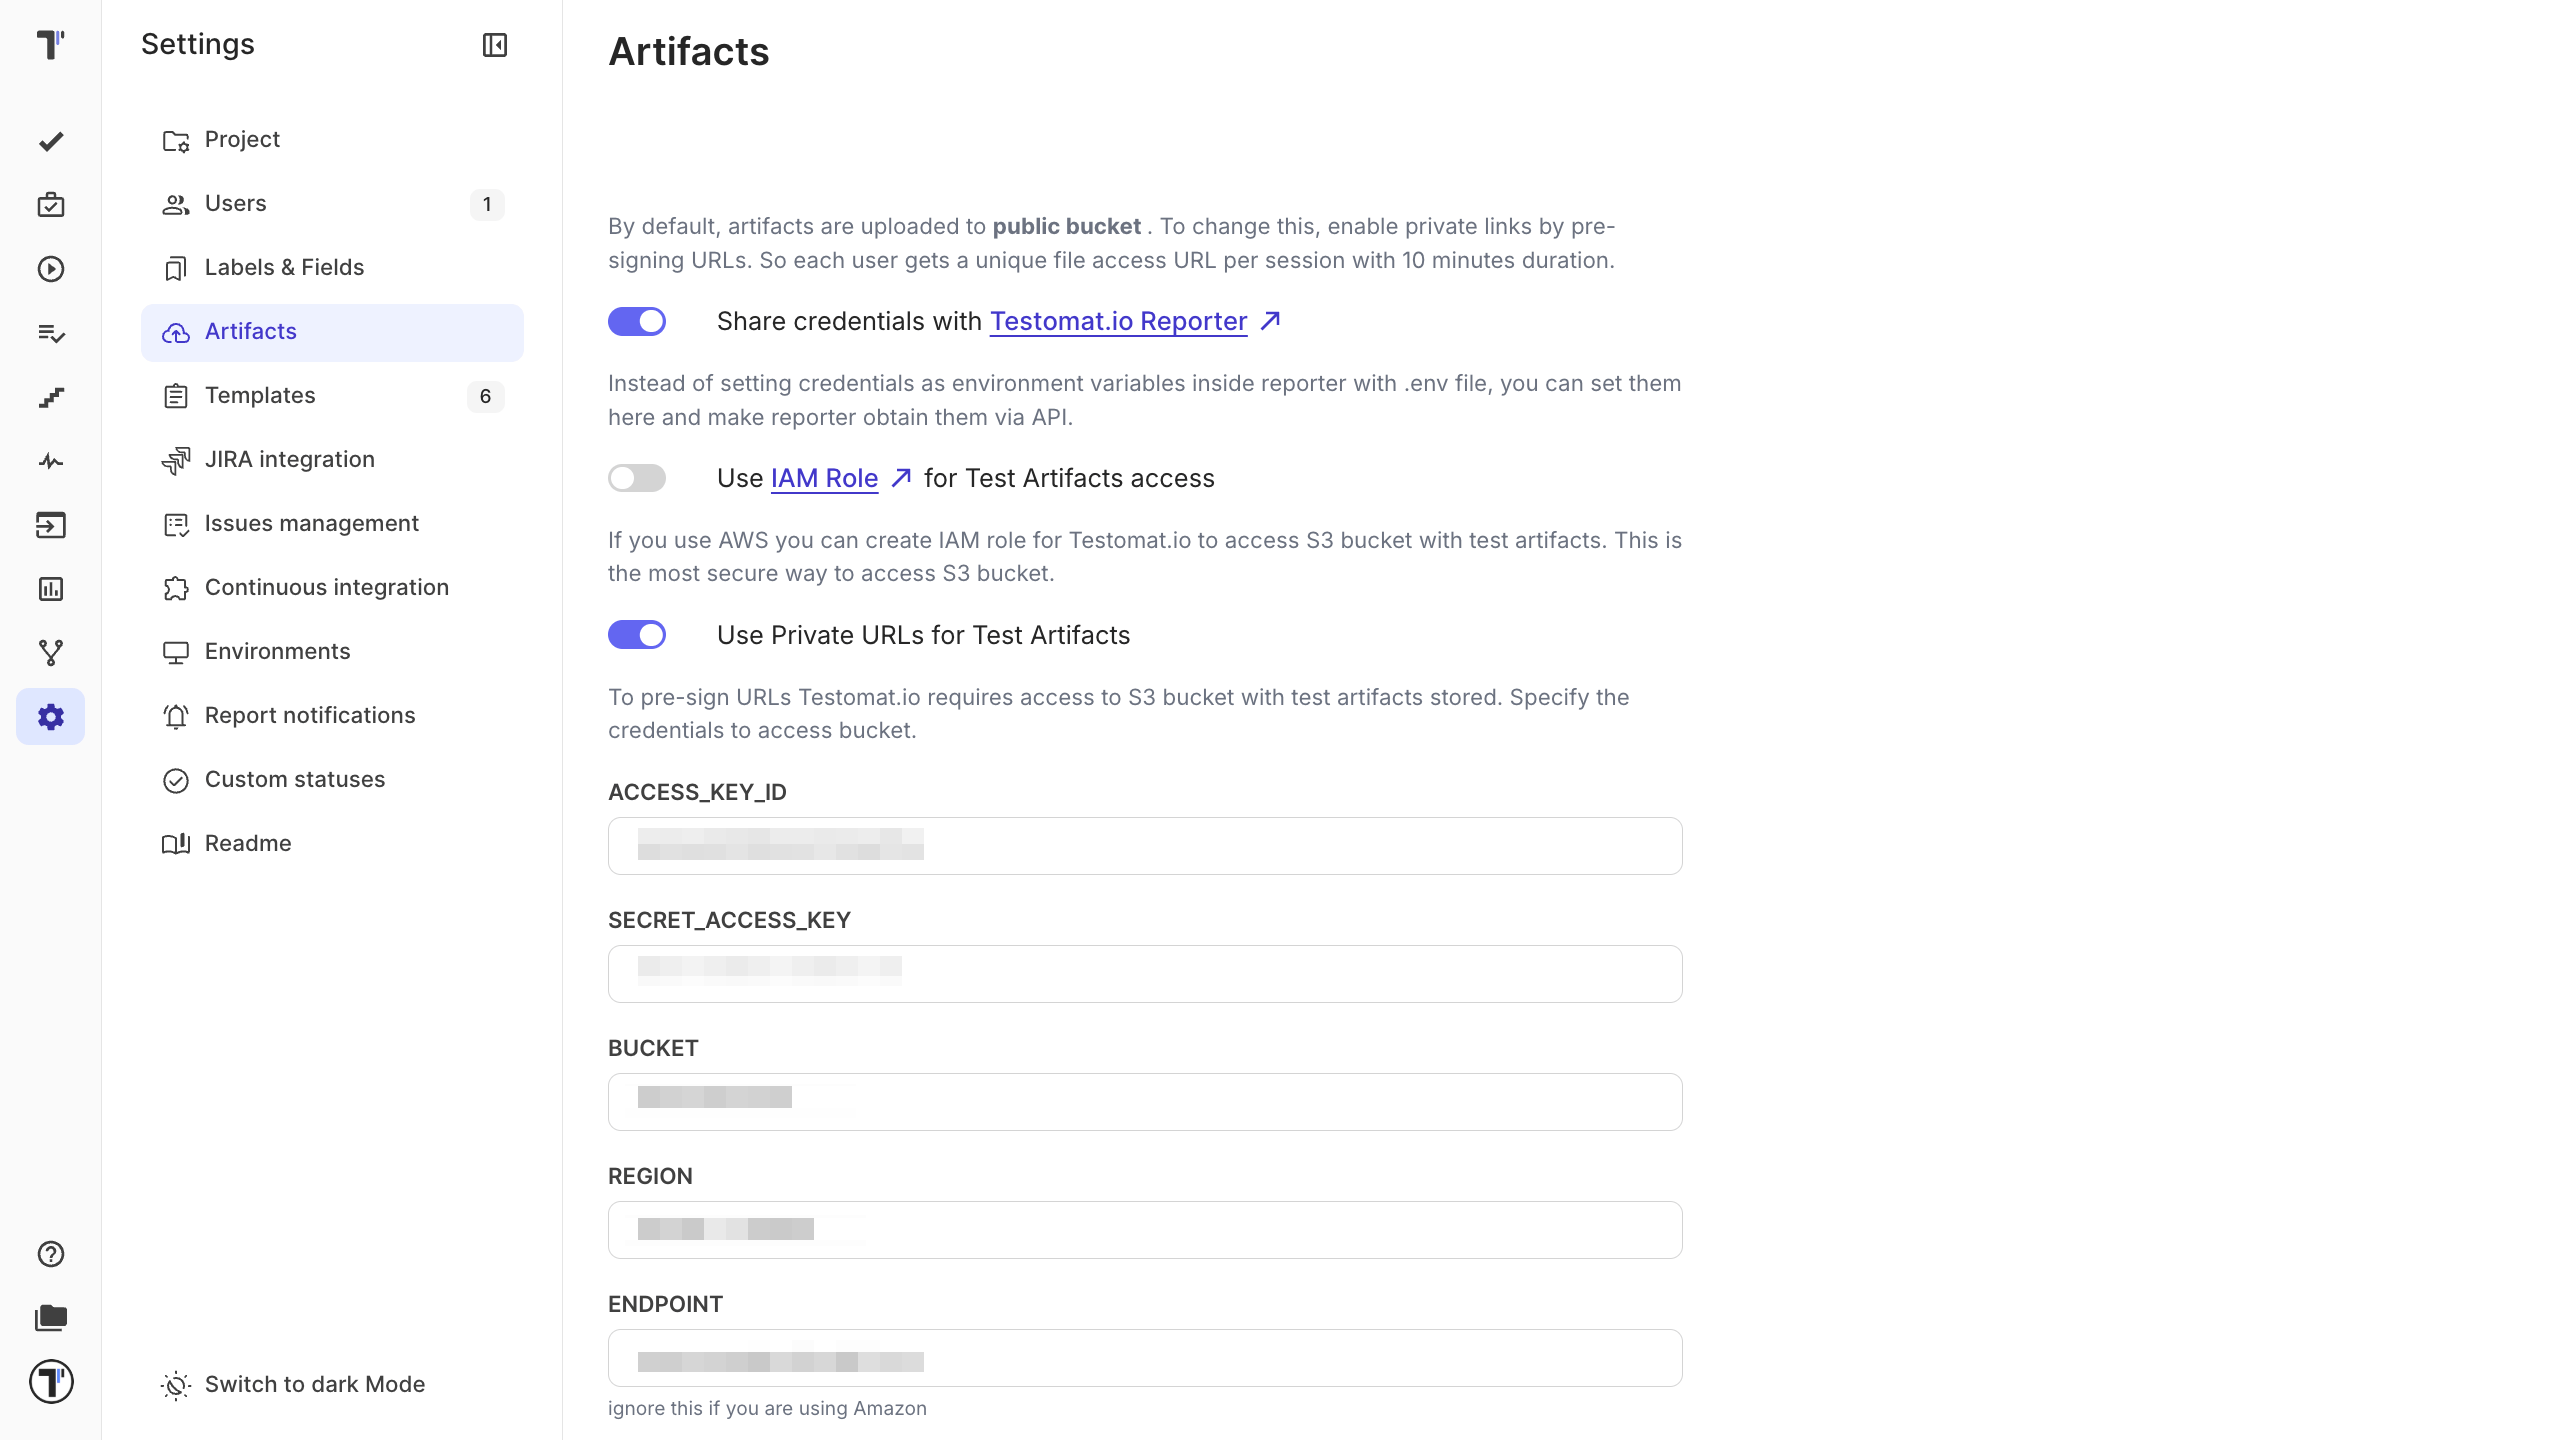
You can attach execution logs, HTML reports, screenshots, videos, generated files, and custom attachments.
- Configure artifact generation in your test framework or build tool.
- Set Up S3 Bucket.
- Configure the S3 integration in Testomat.io.
- Run your tests.
- Open a test result to view or download its artifacts.
Attach a file to a test
Section titled “Attach a file to a test”Attach a file directly to the test result:
@Testvoid userShouldBeFine() { Testomatio.artifact("build/logs/test.log");}The file appears in the test result, ready to view or download.
Attach a file to a step
Section titled “Attach a file to a step”Attach a file to one specific step instead, so it sits in context:
@Testvoid userShouldBeFine() { Testomatio.step("Check user status", () -> { Testomatio.stepArtifact("screenshots/status.png"); assertEquals("fine", user.getStatus()); });}The attachment is displayed within that step, making it clear which action produced it.
Attach files with Allure
Section titled “Attach files with Allure”Existing Allure attachments are imported automatically:
Allure.addAttachment("Log File", Files.newInputStream([Path.of](Path.of)("logs/test.log")));Annotated attachments are supported as well:
import io.qameta.allure.Attachment;
@Attachment(value = "Screenshot", type = "image/png")private byte[] screenshot() {    return Files.readAllBytes(Path.of("screenshot.png"));}
Report parallel runs as one run
Section titled “Report parallel runs as one run”When you split tests across parallel jobs, each job reports separately by default. To collect them into a single run, give every job the same title and set TESTOMATIO_SHARED_RUN:
TESTOMATIO_TITLE="{TITLE}" TESTOMATIO_SHARED_RUN=1 <actual run command>All parallel jobs now report into one run in Testomat.io.
Use a build or commit identifier as the title, so each set of parallel jobs maps to one identifiable run.
Run your tests in CI
Section titled “Run your tests in CI”Store your API key as a secret, then pass it to your test command.
GitHub Actions:
- name: Run Tests run: ./gradlew test env: TESTOMATIO: ${{ secrets.TESTOMATIO }}Jenkins:
withEnv(["TESTOMATIO=${TESTOMATIO}"]) { sh './gradlew test'}GitLab CI:
test: script: - ./gradlew test variables: TESTOMATIO: $TESTOMATIOYour pipeline now automatically reports every run to Testomat.io.
Next Steps
Section titled “Next Steps”- For more frameworks setup, see Testomat.io Java Reporter.
- Spot unstable and slow tests across your runs in Analytics.
- Group the tests that run together with Test Plans.
- Get failures explained from your logs with AI-Powered Features.
Related repositories
Section titled “Related repositories”- java-reporter - reports execution results, steps, and artifacts from JUnit and TestNG projects.
- java-check-tests - imports Java tests, synchronizes test IDs, and maintains test metadata.